

Modern computers, laptops, and mobile devices use solid state drive (SSD) storage, which is power efficient and fast! Since SSDs have no moving parts they're also more durable than hard disk technology in mobile scenarios.
But SSD storage does have limitations. Two primary concerns are:
Essentially, data is written to SSD storage as static charges in individual cells. These cells would normally hold a charge for a very long time, but the act of charging the cell is destructive. It takes a high voltage to weaken the cell barrier before the cell can be charged. And every time a cell is written the barrier is permanently weakened. Eventually the cell will not be able to reliably store a charge.
SSDs manage this problem in a few ways. One tactic is wear leveling, which means that data isn't generally written to the same cell. The drive writes to new cells as often as possible. This levels out the wear across all cells. Another strategy they use is to keep a bank of extra (hidden) cells available. When the SSD sees that a cell is sufficiently "bad", one of the "backup" cells will take its place. All of this happens in the background.
As cells lose their ability to hold a charge, the first symptom is a slowdown in reads. The SSD will try to read a cell, which sometimes returns a bad value (according to an ECC check), so it has to read it again, likely at a different voltage. Eventually the cell returns the correct value. But these repeated read attempts noticeably slow overall drive performance.
For computers and SSD drives that stay powered off for extended periods, you'll see advice that recommends turning on the device every so often. But all that really does is give the SSD a chance to mark bad cells, provided the device tells it to read or write to that bad cell in the first place. Some high end SSDs will perform periodic cell rewrites to refresh the data on their own, but consumer SSDs don't typically do this. To be clear: powering up an SSD does not recharge the cells or truly address these issues.
New SSDs can reliably store data for several years without power. But after actively using an SSD for months or years, it makes sense to begin periodically refreshing the cells. This not only ensures more reliable storage over time, it can also noticeably speed up SSD performance.
I ran some tests on my local workstation to verify these claims. I used a 2 year old MacBook Pro with an SSD boot drive that has remained more than half empty, ensuring lots of new cells were available for writes. It has had several OS upgrades and a couple format/rebuilds.
That Mac booted to login in 16.6 seconds. After refreshing the SSD with the same data, it booted to login in 14 seconds, which is over 15% faster. This indicates that overall performance should also improve, at least with regard to storage transfers anyway. So even on a relatively current machine there was a noticeable speed increase. As a software developer, the biggest benefit for me was the improved reliability.
So, if you want to refresh an SSD, following are some quick guides to help you through the process.
The easiest way to refresh your SSD on Windows is to use SpinRite (https://www.grc.com/sr/spinrite.htm). This is a time-tested, rock solid utility for hard disk maintenance and recovery, which can also handle SSD storage. Run this tool on level 3 to refresh all the cells and map out any bad cells. It will also work wonders on your hard disks.
Note: you need a computer with an Intel chip. SpinRite will not run on Arm.
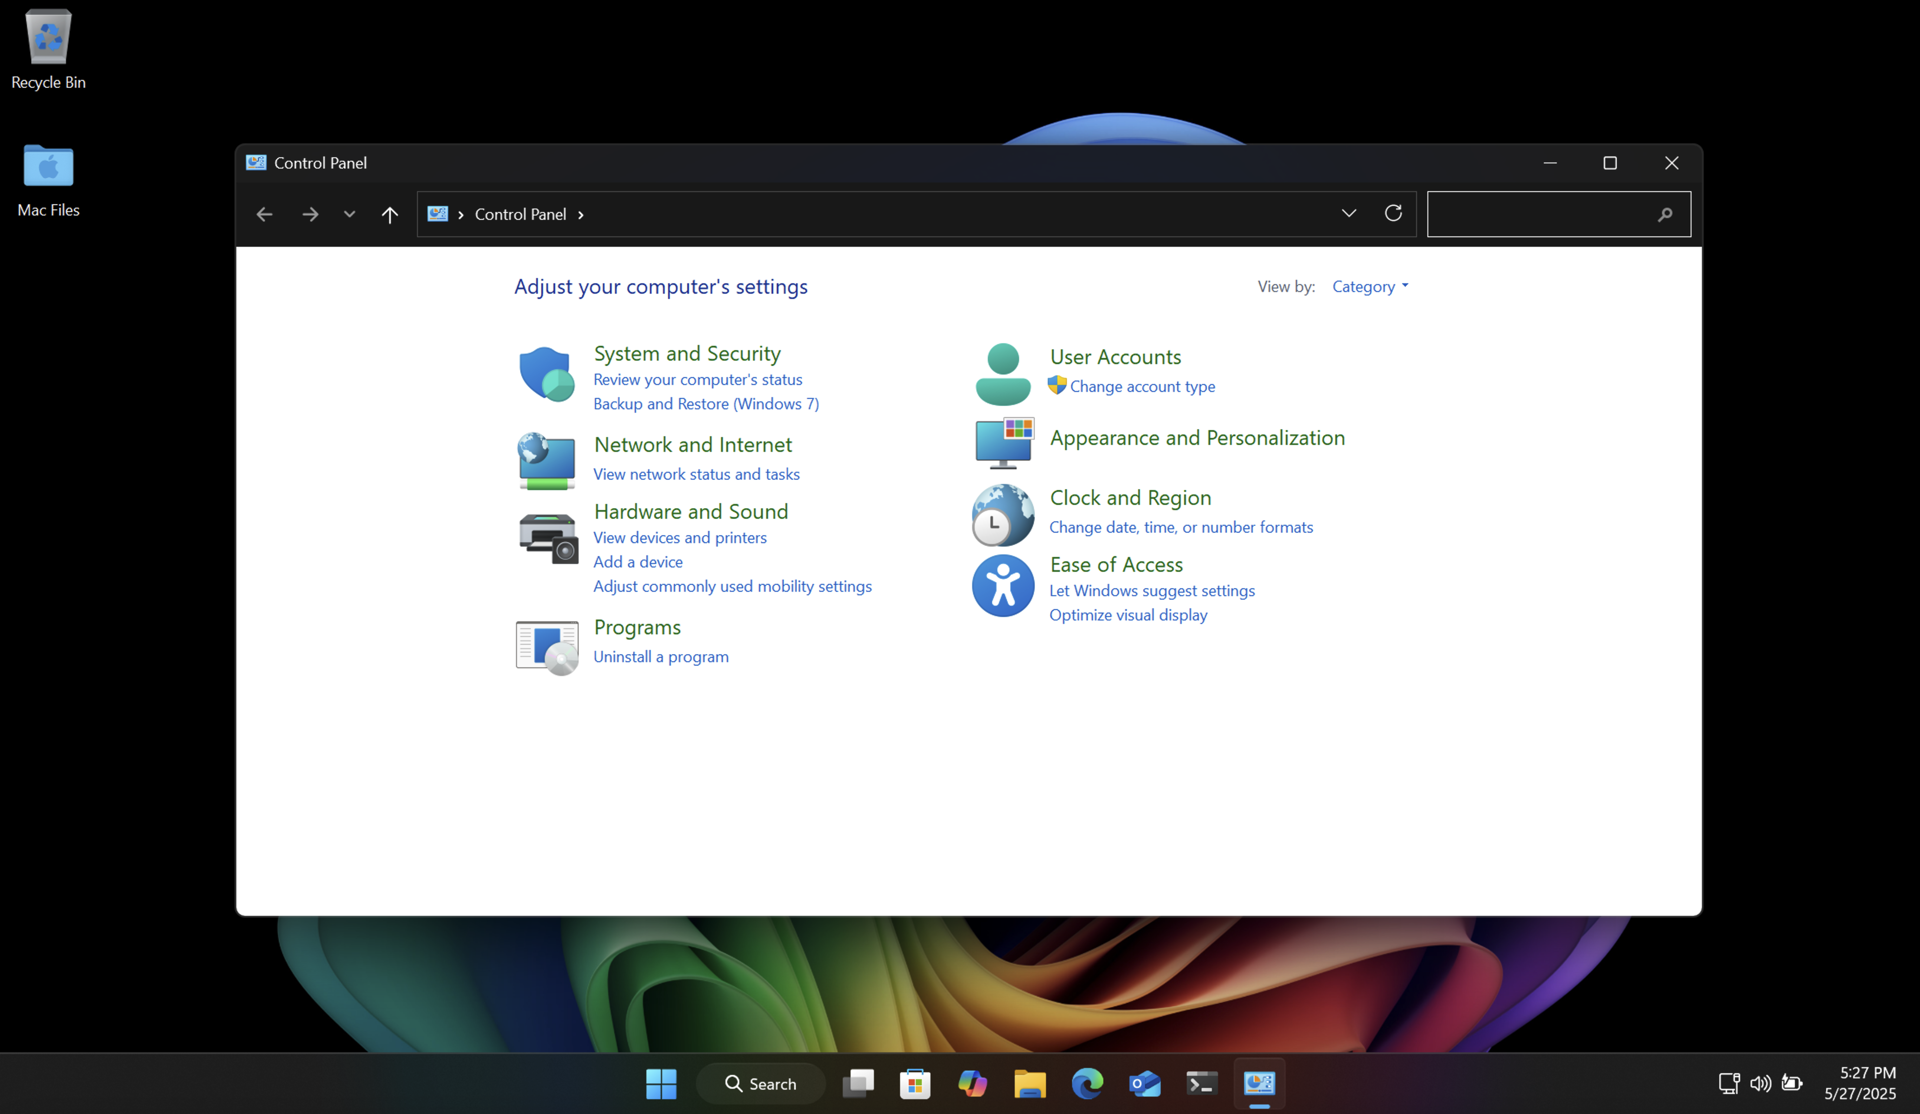
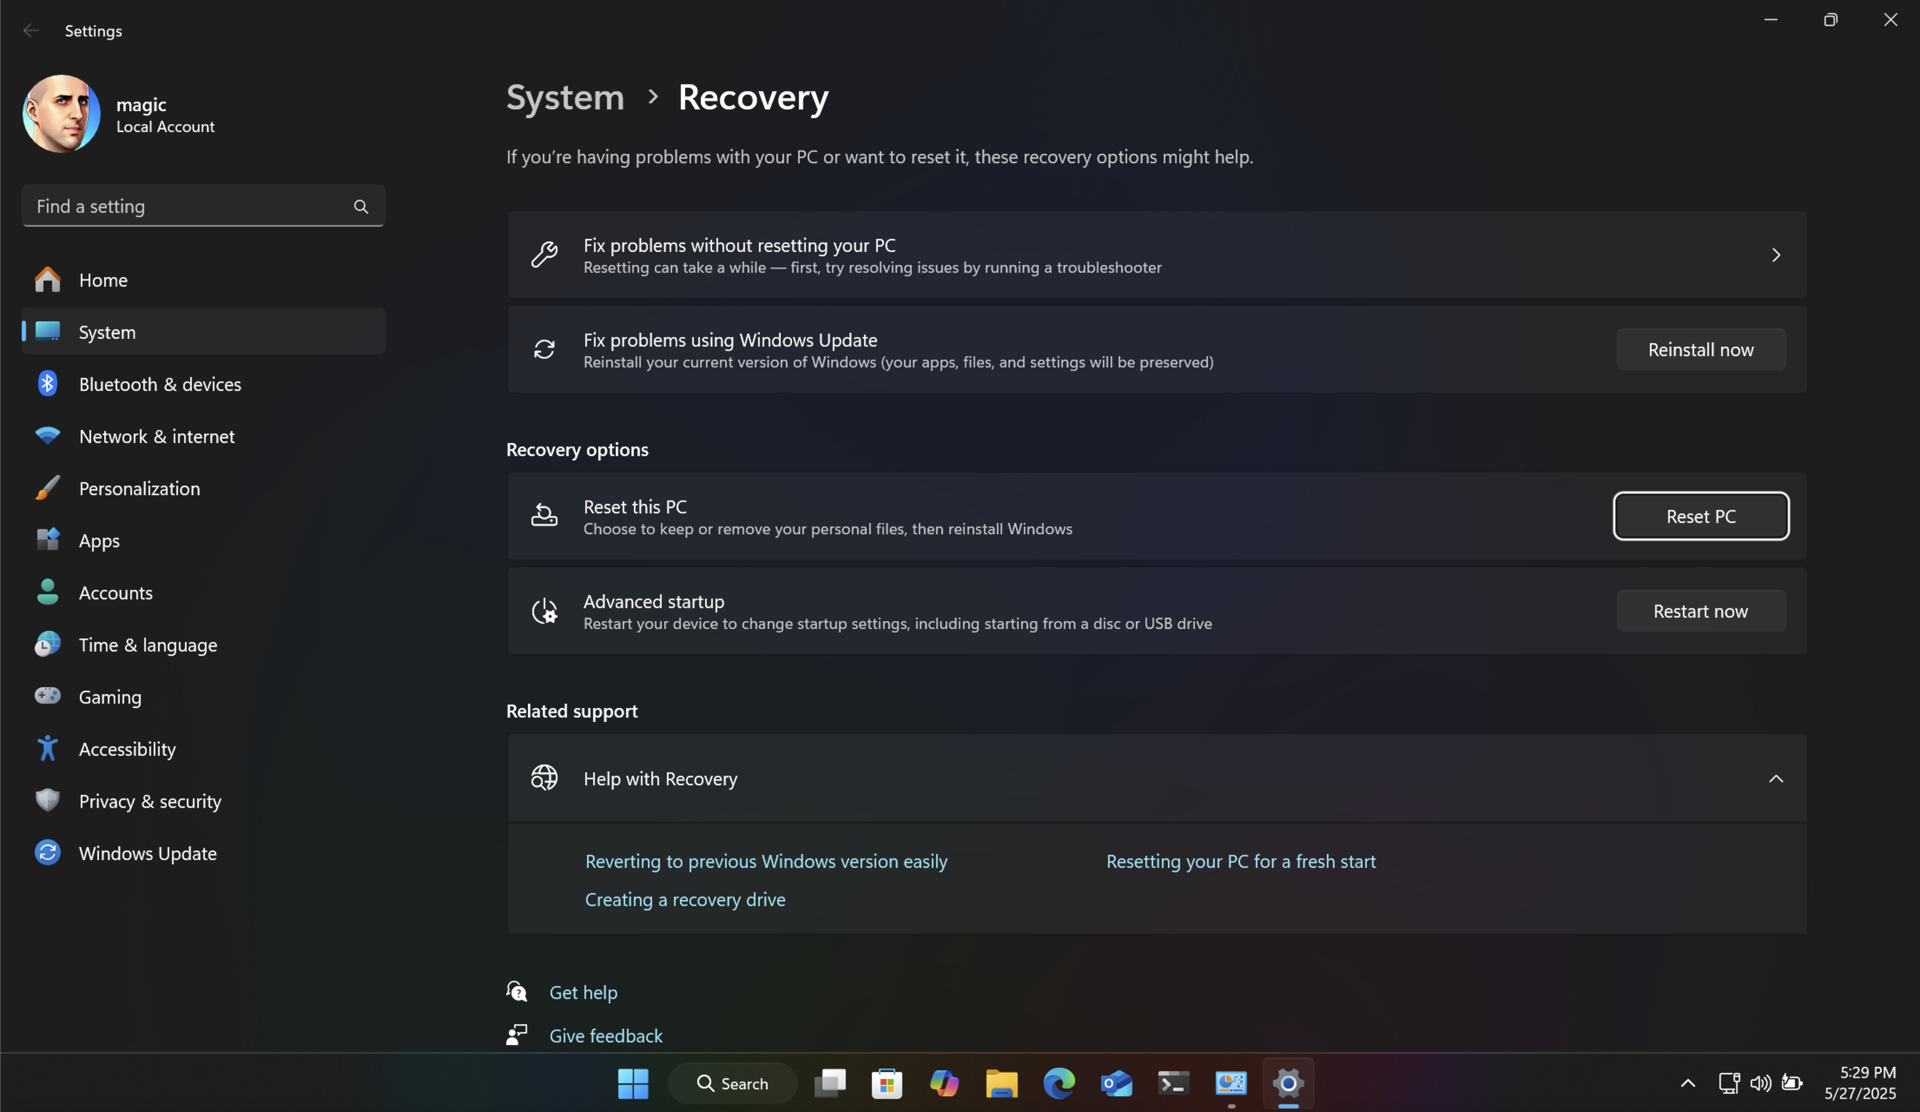
Another way to do this without additional software is to make a system image of your drive using the poorly named "Backup and Restore (Windows 7)" control panel. This clones your entire drive (even the recovery partition) to a USB flash drive or other external media. You can then boot into recovery mode and restore the entire drive from that system image. You'll end up with the same PC with all your files intact. And you will have a backup of your drive for future use.

Both of these methods will return your SSD to like-new performance, and ensure longer data retention.
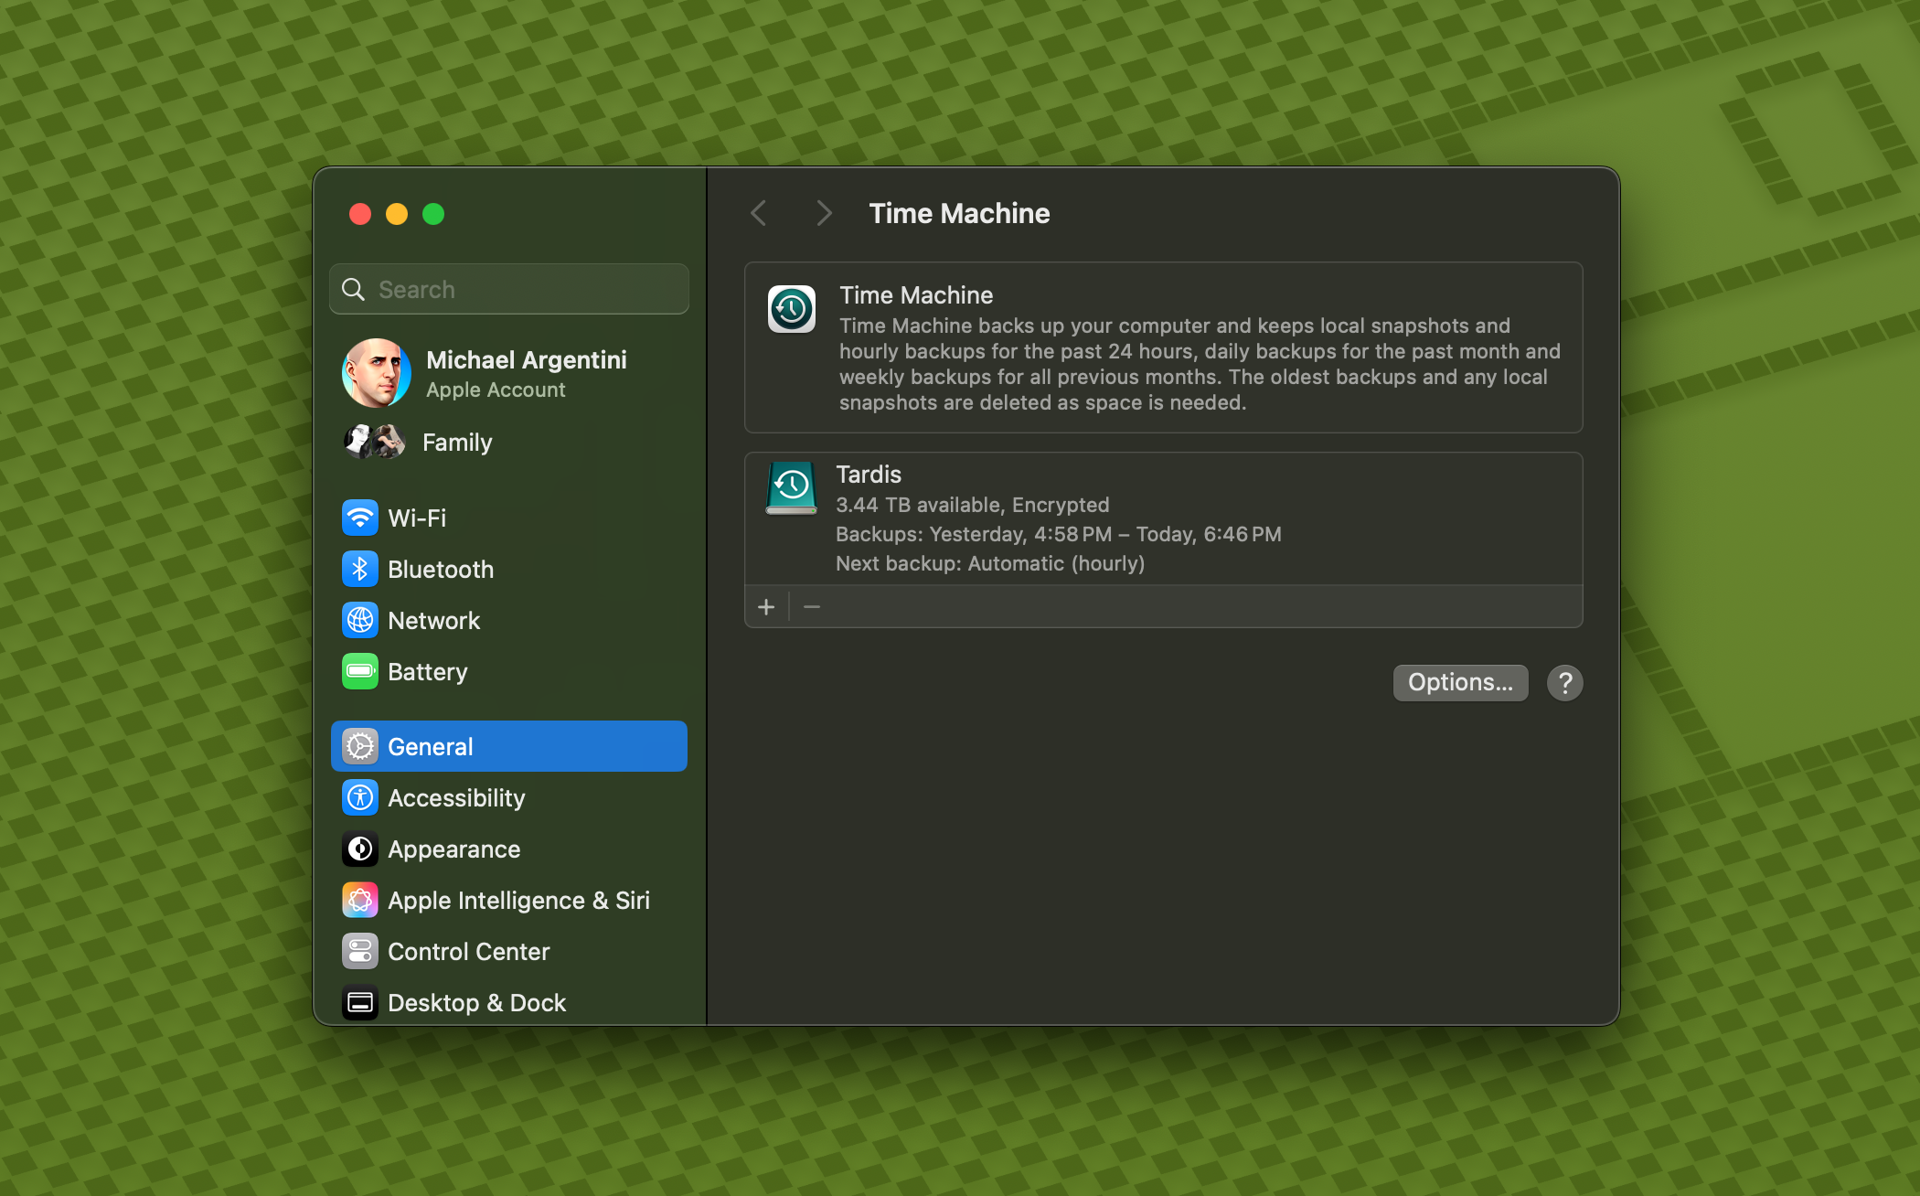
Unlike with Windows, there are no great utilities like SpinRite for modern Apple Silicon Macs. But fear not! There is a way to refresh SSD cells using the built-in Time Machine feature. And it's pretty easy to use. You will be backing up your Mac, then erasing it, reinstalling macOS, and then restoring the backup.
Connect an external storage device to your Mac and configure it in Time Machine as your backup device. Then run a backup.
Note: some applications, like Docker, do not allow Time Machine to back up their data by default. In the case of Docker there is an option to enable this.
Once you have a complete backup, restart your Mac into recovery mode. On modern Apple Silicon Macs you just shut down the computer. Then turn it back on by pressing the power button until the Mac tells you it is loading startup options.
Use Disk Utility to erase the SSD, and then choose to reinstall macOS.
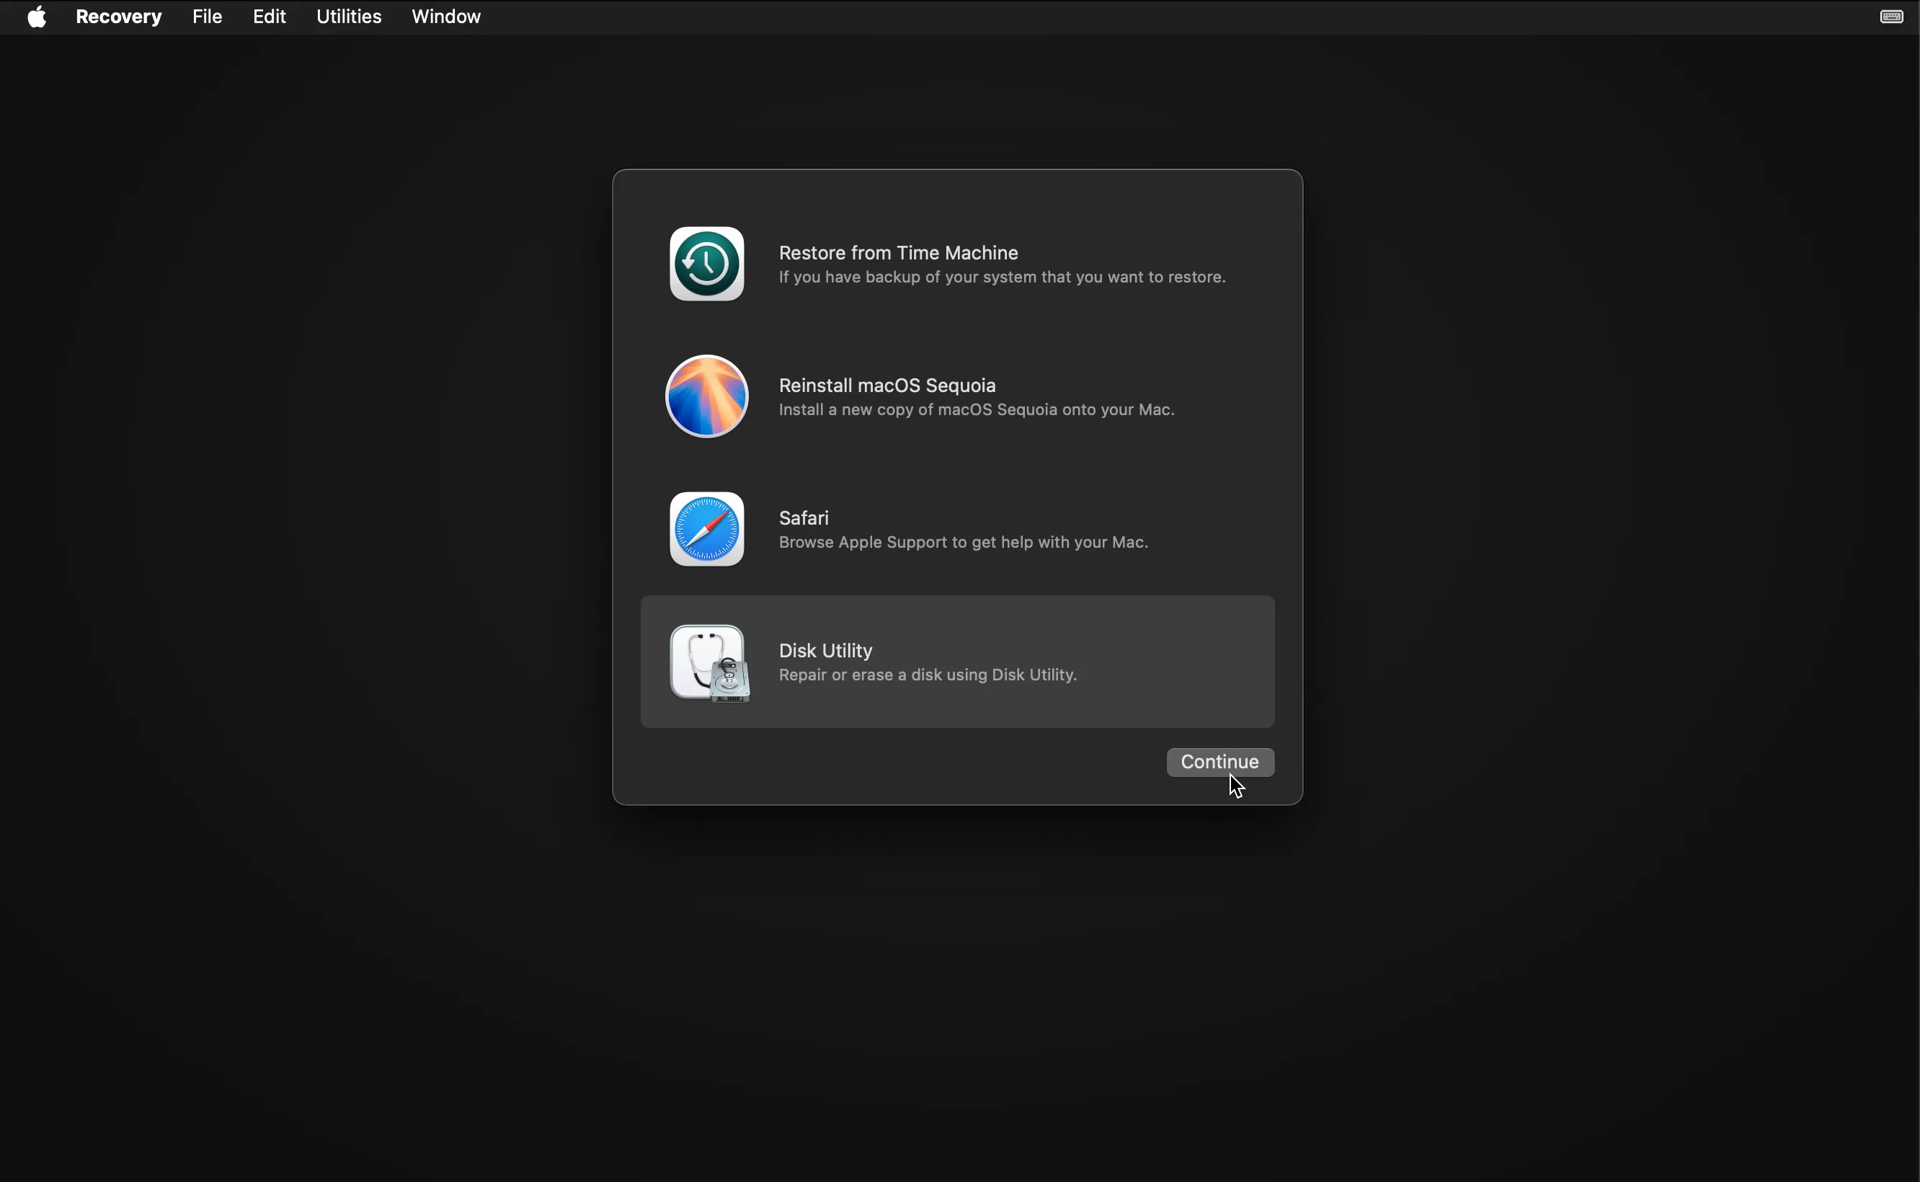
After the OS is installed it will restart and run Migration Assistant.

Choose to transfer files from Time Machine, and follow the instructions. It will show you all Time Machine backups for connected drives. Choose the latest backup entry for your backup drive, and let Migration Assistant do its thing. You will be left with a refreshed SSD with all your files intact.
The research in this area is nascent, so the optimal frequency for refreshing your SSD cells really depends on how well it is performing, how many writes have been made, and how full it is on average. On my server data drive I rarely write new files. But the data is very important. So I'm planning on refreshing the cells yearly just to be safe.
So how often should you run this process? If your SSD is new or averages under 50% usage, and is under 10 years old, I would do this yearly through that period. As your SSD ages (or if you have a mostly full SSD) it may be better to run it more frequently.
There's usually more to the story so if you have questions or comments about this post let us know!
Do you need a new software development partner for an upcoming project? We would love to work with you! From websites and mobile apps to cloud services and custom software, we can help!
SqlPkg is a 64-bit .NET command line (CLI) wrapper for the Microsoft SqlPackage CLI tool with the goal of making common backup and restore operations easier and more powerful. It does this through new Backup and Restore actions that provide additional features like the exclusion of specific table data in backups and destination prep prior to restore.
Visit the repository to see how you can install this tool to begin using it right away.
/Action:Backup
This mode is equivalent to Action:Export to create a .bacpac file, with the following differences.
/Action:Restore
This mode is equivalent to Action:Import to restore a .bacpac file, with the following differences.
/Action:Backup-All
This mode will back up all user databases on a server.
/Action:Restore-All
This mode will restore all *.bacpac files in a given path to databases with the same names as the filenames.
When not using SqlPkg special action modes, the entire argument list is simply piped to SqlPackage and will run normally. So you can use sqlpkg everywhere SqlPackage is used.
1. Install Microsoft .NET
SqlPkg requires that you already have the .NET 8.0 runtime installed, which you can get at https://dotnet.microsoft.com/en-us/download.
Because SqlPkg uses Microsoft SqlPackage, you will also need to install the .NET 6.0 runtime as well as SqlPackage.
dotnet tool install -g microsoft.sqlpackage2. Install SqlPkg
Run the following command in your command line interface (e.g. cmd, PowerShell, Terminal, bash, etc.):
dotnet tool install --global fynydd.sqlpkgLater you can update SqlPkg with the following command:
dotnet tool update --global fynydd.sqlpkgIf you need to completely uninstall SqlPkg, use the command below:
dotnet tool uninstall --global fynydd.sqlpkgThere's usually more to the story so if you have questions or comments about this post let us know!
Do you need a new software development partner for an upcoming project? We would love to work with you! From websites and mobile apps to cloud services and custom software, we can help!
The DataStore project is a high performance JSON object store (ORM) for SQL Server.
DataStore uses and automatically creates and manages a pre-defined SQL Server data structure that can coexist with existing database objects. All database operations are performed with the DataStore helper class.
Your models are stored in the database as JSON text so you can have most any kind of object structure, provided your models inherit from DsObject.
Instantiating DataStore with settings is non-destructive. Any existing DataStore tables are left untouched. Methods to delete all or unused schema objects are provided for those edge cases.
Instantiate DataStore with a settings object and database schema will be created for all classes that inherit from DsObject. The following attributes can be used in your classes:
[DsUseLineageFeatures]
[DsSerializerContext(typeof(UserJsonSerializerContext))]
public class User: DsObject
{
    [DsIndexedColumn]
    public string Firstname { get; set; }

    [DsIndexedColumn]
    public int Age { get; set; }

    public List<Permissions> Permissions { get; set; }

    [DsIndexedColumn("Food", "Color")]
    public Dictionary<string, string> Favorites { get; set; } = new();
}

[JsonSerializable(typeof(User))]
[JsonSourceGenerationOptions(WriteIndented = false)]
internal partial class UserJsonSerializerContext : JsonSerializerContext
{ }You can create a DataStore instance anywhere in your code:
var dataStore = new DataStore(new DataStoreSettings {
    SqlConnectionString = sqlConnectionString,
    UseIndexedColumns = true
});
You can also use DataStore as a singleton service:
services.AddSingleton<DataStore>((factory) => new DataStore(new DataStoreSettings {
    SqlConnectionString = sqlConnectionString,
    UseIndexedColumns = true
}));Creating and saving a DataStore object is simple:
var user = new User
{
    FirstName = "Michael",
    LastName = "Fynydd",
    Age = 50,
    Permissions = new List<Permission>
    {
        new() { Role = "user" },
        new() { Role = "admin" },
        // etc.
    }
};

await dataStore.SaveAsync(user);
The saved object is updated with any changes, like lineage and depth information, creation or last update date, etc. And you can provide a list of objects to save them all in one call.
Querying the database for objects is simple too. In any read calls you can specify a DsQuery object with a fluent-style pattern for building your query. In the query you can specify property names as strings with dot notation:
var users = await dataStore.GetManyAsync<User>(
    page: 1,
    perPage: 50,
    new DsQuery()
        .StringProp("LastName").EqualTo("Fynydd")
        .AND()
        .StringProp("Permissions.Role").EqualTo("admin")
        .AND()
        .GroupBegin()
            .NumberProp<int>("Age").EqualTo(50)
            .OR()
            .NumberProp<int>("Age").EqualTo(51)
        .GroupEnd(),
    new DsOrderBy()
        .Prop<int>("Age").Ascending()
);
Or you can use the model structure to specify names, and make code refactoring easier:
var users = await dataStore.GetManyAsync<User>(
    page: 1,
    perPage: 50,
    new DsQuery()
        .StringProp<User>(u => u.LastName).EqualTo("Fynydd")
        .AND()
        .StringProp<User, Role>(u => u.Permissions, r => r.Role).EqualTo("admin")
        .AND()
        .GroupBegin()
            .NumberProp<User,int>(u => u.Age).EqualTo(50)
            .OR()
            .NumberProp<User,int>(u => u.Age).EqualTo(51)
        .GroupEnd(),
    new DsOrderBy()
        .Prop<User>(o => o.Age).Ascending()
);If you need to access object properties without knowing the object type, DsObject exposes JSON features that allow you to access property values using standard JSON path syntax:
var users = await dataStore.GetManyAsync<User>(
    page: 1,
    perPage: 50
);

foreach (DsObject dso in users)
{
    dso.Serialize(dataStore);

    var lastName = dso.Value<string>("$.LastName");
    var roles = dso.Values(typeof(string), "$.Permissions.Role");

    // etc.
}
Remember: these JSON features are read-only. If you change a property value in the DsObject you will need to call Serialize() again to update the JSON representation.
There's usually more to the story so if you have questions or comments about this post let us know!
Do you need a new software development partner for an upcoming project? We would love to work with you! From websites and mobile apps to cloud services and custom software, we can help!

We'll be presenting the following topic at the 2012 UK Semantic Tech & Business (SemTech) Conference:
Building a Semantic Enterprise Content Management System from Scratch
2012 UK Semantic Tech & Business Conference
Millennium Gloucester Hotel, London, England
Thursday, September 20, 3:45-4:15 PM
Detail on our program is available on the SemTechBiz UK 2012 site. The conference runs September 19-20. We hope to see you there!
There's usually more to the story so if you have questions or comments about this post let us know!
Do you need a new software development partner for an upcoming project? We would love to work with you! From websites and mobile apps to cloud services and custom software, we can help!
In early June, Fynydd was invited to speak at the 2012 Semantic Tech & Business Conference in San Francisco, California. By all accounts, Fynydd’s message was unique, informative, and overall very well received by conference attendees.
The topic “How To Build a Sematic Content Management System From Scratch” garnered much interest even before the conference began. During our presentation, we outlined a case study based on a recent Fynydd client engagement. We walked through the successes and challenges Fynydd faced in designing and implementing a semantic prototype system for a large financial institution.
Though primarily invited as a speaker, Fynydd also secured a location on the exhibit floor of the conference so that we could present our full breadth of services to conference attendees. Activity at the exhibit was bustling. Attendees remarked about Fynydd's unique set of service offerings, as well as how we worked with other exhibitor products to build holistic solutions for our clients. Conversations focused heavily on user interface design and overall user experience as well as implementation of semantic technologies across a wide variety of industries and projects.
With the success of this conference, Fynydd was asked to present at the SemTechBiz satellite conference in London later this year. You can find out more by visiting the Fynydd SemTech page and the SemTechBiz London site.
There's usually more to the story so if you have questions or comments about this post let us know!
Do you need a new software development partner for an upcoming project? We would love to work with you! From websites and mobile apps to cloud services and custom software, we can help!