

Vector search has been around for a long time. For example, Google has been using it since the late 1990s. This powerful, almost magical technology serves as a core component of most web and app services today, including modern AI-powered search using retrieval augmented generation (RAG). It provides a low-power way to leverage AI's natural language processing to find data with semantic context.
A vector database stores data as numerical embeddings that capture the semantic meaning of text, images, or other content, and it retrieves results by finding the closest vectors using similarity search rather than exact matches. Sounds like an AI large language model (LLM) right? This makes it great for web and app content because users can search by meaning and intent, not just keywords. So synonyms and loosely related concepts still match. It also scales efficiently which is one reason large organizations like Google have used it.
A happy side effect of how these platforms work is that they're also good at handling misspellings, to a point. To really get robust handling of spelling variations, however, two strategies tend to be common:
Spell correct the actual search text before using it
Include character n-grams in your vector database entries
Character n-grams are vector embeddings (like commonly used semantic embeddings) that break text into overlapping sequences of characters, allowing vector search systems to better match terms despite typos, inflections, or spelling variations. Without these n-grams, a misspelled query like "saracha sauce" would likely return a higher score for "hot sauce" entries. But including character n-grams, a combined (fused) search would more consistently return a higher score for items with the correct spelling "sriracha sauce".
Using these n-grams can better handle searches with:
typos
missing letters
swapped letters
phonetic-ish variants
common misspellings
How does this work? At a high level, it adds a character match capability to the standard semantic search used by most vector database implementations. Here's a quick example of what happens under the hood. Take the first word in our previous example:
sriracha
3-grams: sri, rir, ira, rac, ach, cha
4-grams: srir, rira, irac, rach, acha
saracha
3-grams: sar, ara, rac, ach, cha
4-grams: sara, arac, rach, acha
Shared grams:
shared 3-grams: rac, ach, cha
shared 4-grams: rach, acha
So even though the beginning is wrong (sri vs sa), the ending chunks that carry a lot of the distinctive shape of "sriracha" survive (racha, acha, cha). And since the second word is the same, they have even more matching grams.
When these matches are fused with semantic matches, it adds weight to the correctly spelled "sriracha sauce" entry, yielding a better match set.
When it comes to including character n-grams, there are only a couple changes you need to make to a standard semantic vector database implementation:
When you generate embeddings, you also need to generate character n-gram embeddings; this is true both when you store data in the database, and when you search.
When searching, you need to execute a search both on the semantic vectors and the n-gram vectors, then fuse the results using Reciprocal Rank Fusion (RRF), which is a great way to merge disparate result sets and combine the scores.
The following samples will fill those gaps. They are written with C# for .NET, which is part of a common stack we use to build cross-platform, secure, high-performance web and mobile apps and services for our clients. We also tend to prefer the vector database Qdrant for its performance, maintainability, and open source model. So that is also referenced in the samples.
References to AiService.GenerateEmbeddingsAsync() are not covered here. Essentially it's a method to generate standard semantic embeddings. Replace that with your own (likely existing) method. And references to QdrantService.Client are merely references to a standard Qdrant client provided by the Qdrant Nuget package.
Note: Some of the code was generated by AI, but was reviewed and refactored by an actual human developer (me!).
First, you need a way to create n-grams. The CharNGramEmbedding class below will fill that gap. It allows you to generate character n-grams for a given string, and it also provides a method for fusing the semantic and n-gram search results into a single, weighted result set.
Now that you have the character n-gram generation and fusion handled, following is an example of performing a Qdrant upsert of a sample food object, including both sets of vectors.
Lastly, the following example shows how you can search the Qdrant data using both sets of vectors. Embeddings (semantic and character n-grams) for the prompt are generated and used in the search.
For the best fused results each search (semantic, n-grams) needs to return 3-5 times the number of the final result set. This is because you're trying to recover a good final top-K from two imperfect retrievers. If each retriever only returns exactly K (or close to it), you often don't have enough overlap + near misses to let fusion do its job, especially when the two methods return different items, and rank positions aren't directly comparable.
There's usually more to the story so if you have questions or comments about this post let us know!
Do you need a new software development partner for an upcoming project? We would love to work with you! From websites and mobile apps to cloud services and custom software, we can help!


Creating an emulator is a very powerful experience. Not only do you become intimately familiar with the target hardware, but you virtually recreate it with simple keystrokes. Emulators aim to recreate every single component of a piece of hardware down to the electrical timing of a single CPU cycle, not to be confused with simulators, which simply mimic a platform. It’s not always a simple task, but it’s very rewarding when you power it up and are presented with a piece of childhood memory. Sure, there are plenty of emulators out there, but creating your own makes using it and tweaking it so much more fun.
The MOS 6510 is a modified version of the popular MOS 6502. The 6502 was used in systems like the Apple IIe, Atari 800 and 2600, Commodore VIC-20, Nintendo Famicom, and others. The biggest difference with the MOS 6510 is the addition of a general purpose 8-bit I/O port.
I wanted to emulate a Commodore 64... Why? The Commodore 64 was a staple of my childhood. Before graphical OS’es and the internet, there was just imagination and a command prompt. Pair that with some BASIC programming books that my dad left lying around and I felt like I had the world at my fingertips. I wanted to become more familiar with the first computer I ever used. The C64 is simple and complex at the same time, and its internal workings intrigued me.
The MOS 6510 was the CPU that the C64 used. To emulate a full C64 machine, you would also need to emulate the MOS 6581 SID (sound), MOS VIC-II (display), MOS 6526 CIA (interface adapters), I/O and more, but this article focuses on the heart of it all – the CPU. The memory in a C64 is also outlined, because without memory, the CPU can’t do very much.
First off, this article is, as mentioned in the title, a crash course. So, I won’t be going into a lot of detail. It’s more of a primer for those of you who are interested in MOS 6510 emulation, and something to send you off in the right direction.
The basic cycle your emulator will perform will be the following:
Read next instruction from memory at the PC (program counter)
Process instruction
Process Timers on CIA1 and CIA2 (not covered in this article)
Update screen via VIC-II (not covered in this article)
Calculate cycles (for emulators that aren’t cycle-exact)
The last point only applies if you are making an instruction-exact emulator vs. a cycle-exact emulator. Instruction-exact emulation is easier because you simply process an instruction and increment by the number of cycles that instruction is supposed to take, but it is less accurate and may result in some features of the system not working exactly right. Cycle-exact emulation only processes one CPU cycle per loop in your emulator, so one instruction could be performed over multiple loops. That method is very accurate but is more complex to implement as you will need to be more granular in how you process instructions.
The CPU is responsible for processing instructions from memory. It’s an 8-bit processor, which means the registers will store 8 bits each, other than the PC (program counter), which is 16 bits (high and low bytes) so that it can store a memory location.

To emulate the processor, you will need to implement the following components...
Registers are small areas of memory located directly in the processor that have extremely fast access. Each register has a purpose and can be used in various ways depending on the context of an instruction.
PC (program counter)
Stores the active address in memory.
S (stack pointer)
Pointer to current location in stack, which starts at 0x01FF in memory and grows downward to 0x0100
P (processor status)
See status flags below
A (accumulator)
Stores arithmetic and logic results
X (index register)
Used for modifying effective addresses
Y (index register)
Used for modifying effective addresses
The status flags are used in the byte that makes up the P register. They can alter the way certain things behave when set or unset and provide status outcomes for operations.
N (1 – negative flag)
V (2 – overflow flag)
X (4 – unused flag)
B (8 – break flag)
D (16 – decimal mode flag)
I (32 – interrupt disable flag)
Z (64 – zero flag)
C (128 – carry flag)
Addressing modes determine where an instruction finds a value to work with. One instruction can have many variations that use different addressing modes, these are called opcodes.
Implied
Operand is in accumulator, no addressing needed. This is for one byte instructions that operate on the accumulator
Immediate
Operand is at byte after instruction, no addressing needed
Relative
Address at PC +/- value of byte after instruction (interpreted as signed byte). This is used for branching. It basically allows the PC to branch from -128 to 127 bytes from its current position
Zero Page
Address at byte after instruction
Zero Page X
Address at byte after instruction + X register
Zero Page Y
Address at byte after instruction + Y register
Absolute
Address at word after instruction
Absolute X
Address at word after instruction + X register
Absolute Y
Address at word after instruction + Y register
Indirect
Address at memory which is pointed to by word after instruction
Indirect X
Address at memory which is pointed to by word after instruction + X register
Indirect Y
Address at memory which is pointed to by word after instruction + Y register
Click for more information on MOS 6510 addressing modes.
There are too many instructions to list in this crash course, but here is a link to an opcode matrix. It shows the value of each opcode, the associated instruction and addressing mode, as well as the logical function of each.
One of the most important aspects of emulating the CPU is the timing. For my C64 emulator, I used the PAL specification of 0.985 MHz, or 985,000 cycles/second. If you are implementing the NTSC specification, then you would use 1.023 MHz. As I said before, if not implementing cycle-exact emulation, you need to determine how many cycles each instruction takes and increment the cycles that have passed. This is important for determining when certain IRQ’s should be fired as well as the progress of the raster line when implementing the VIC-II. The raster line position will have to match the CPU cycles (screen refresh is 50 Hz on PAL, 60 Hz on NTSC) so that programs which rely on raster line position to create certain graphical effects will work.
Also, keep in mind that certain things take extra cycles. For instance, if an instruction uses Absolute Y addressing and crosses the page boundary in memory, that takes an extra CPU cycle.
The MOS 6510 is a little endian chip. This means that when you are reading a word from memory (16 bits on the MOS 6510), you will need to read in the second address position first, followed by the first address position. You can then use the result to create a 16 bit variable in your programming language of choice. A simple example of this is as follows:
(peek(address + 1) << 8) | peek(address)Where peek() grabs a byte from a memory location. The byte from the second address location is bit shifted 8 positions left and is then bitwise OR’ed with the byte from the first address location.
The C64 has 65,535 bytes of memory, or 64 KB. Bank switching is used to switch the ROM and I/O in and out by changing the latch bits in the first two bytes of memory. A page of memory on the C64 is 256 bytes. The first page is called the Zeropage and is easily addressable with zeropage addressing, which is fast because the C64 is an 8-bit machine.

Here is a basic mapping of the C64’s memory:
0x0000-0x00FF: Zeropage – first two bytes contain directional and latch bits that can be set to swap ROM’s and I/O in and out of place.
0x0100-0x01FF: Stack
0x0200-0x03FF: OS
0x0400-0x07FF: Screen
0x0800-0x9FFF: Free RAM for BASIC programs
0xA000-0xBFFF: BASIC ROM or free RAM for machine language programs when ROM switched out
0xC000-0xCFFF: Free RAM for machine language programs
0xD000-0xDFFF: CHAR ROM or I/O or Sprite data, interrupt register, etc. when CHAR ROM and I/O switched out.
0xE000-0xFFFF: KERNEL ROM or free RAM for machine language programs when ROM switched out
When I/O is switched on, the region 0xD000-0xDFFF maps to the following:
0xD000-0xD3FF: VIC-II registers
0xD400-0xD7FF: SID registers
0xD800-0xDBFF: Color memory
0xDC00-0xDCFF: CIA1
0xDD00-0xDDFF: CIA2
0xDE00-0xDEFF: I/O 1
0xDF00-0xDFFF: I/O 2
Click for a more detailed Commodore 64 memory map.
There are two important factors when initializing your emulator – the PC and directional/latch bits in the first two bytes of memory.
The first byte of memory, which contains directional bits, should be initialized to 0xFF. The second byte, which contains the latch bits, should be initialized to 0x07 (00000111). This will enable the KERNEL ROM, BASIC ROM, and I/O. The CHAR ROM and underlying memory of these locations will not be accessible unless the banks are switched.
The PC should be initialized to the word read from memory location 0xFFFC. This will read from the KERNEL ROM due to the latch bits initialization.
That concludes the crash course. Hopefully you’re at least a little more informed about the MOS 6510 than before. The only external pieces you will need to obtain in order to create your emulator are the three ROMs as mentioned above – BASIC, CHAR and KERNEL. These can usually be obtained somewhere online or from another emulator. It’s a lot of work to emulate anything, but it’s a fun project and worth it in the end.
There's usually more to the story so if you have questions or comments about this post let us know!
Do you need a new software development partner for an upcoming project? We would love to work with you! From websites and mobile apps to cloud services and custom software, we can help!

We're always reading about the latest security exploit or distributed denial of service (DDoS) attack. When we do it tends to feel like something that happens to other people or businesses, and is generally a nuisance when it comes to our own lives. But could we be part of the problem?
There are a couple things you can do to determine if your devices are being used by nefarious actors to attack and compromise networks and services on the Internet. The first is to see if your network is exposing any openings that can be exploited.
The Shodan search engine is a great tool for determining if your network is exposing any open ports. Ports are like doors that allow outsiders to connect to devices within your network. There are 65,535 possible ports, some of which are standard ports used by common services. For example, web servers use ports 80 and 443 for insecure and encrypted communication respectively. Open up those ports and point them to a device on your network, and you're now hosting a public website.
This is where Shodan comes in. It allows you to search for your network IP to see what's open. You need to sign up to use the filters (it's free), but it's a one-step process if you simply sign in using a Google account. Then in the search bar you can search your IP address like this:
ip:73.198.169.112If you have exposed ports you'll see information about which ports and protocols are available. You can even search a subnet, representing a range of IP addresses, like this:
ip:73.198.169.0/24
Suffice it to say that most people shouldn't have any results available. If you do, make sure the open port is supposed to be open. For example, if you're hosting a Minecraft server or website.
Another great, free, and simple tool is the GreyNoise IP Check. Visit the website and it will scan its massive botnet database to see if your IP address has ever been used in a distributed attack.
If your computer has been hacked and is under the control of someone on the Internet, they may use it (and your Internet connection) to participate in a distributed denial of service (DDoS) attack. That's when a large number of computers on the Internet make requests for a website at once, overwhelming the server and effectively taking it offline. These attacks are used for various reasons, like ransom demands.
GreyNoise watches the Internet's background radiation—the constant storm of scanners, bots, and probes hitting every IP address on Earth. They've cataloged billions of these interactions to answer one critical question: is this IP a real threat or just internet noise? Security teams trust their data to cut through the chaos and focus on what actually matters.
There's usually more to the story so if you have questions or comments about this post let us know!
Do you need a new software development partner for an upcoming project? We would love to work with you! From websites and mobile apps to cloud services and custom software, we can help!

AI prompts that reveal insight, bias, blind spots, or non-obvious reasoning are typically called “high-leverage prompts”. These types of prompts have always intrigued me more than any other, primarily because they focus on questions that were difficult or impossible to answer before we had large language models. I'm going to cover a few to get your creative juices flowing. This post isn't a tutorial about prompt engineering (syntax, structure, etc.) it's just an exploration in some ways to prompt AI that you may not have considered.
This one originally came to me from a friend who owns the digital marketing agency Arc Intermedia. I've made my own flavor of it, but it's still focused on the same goal: since potential customers will undoubtedly look you up in an AI tool, what will the tool tell them?
If someone decided not to hire {company name}, what are the most likely rational reasons they’d give, and which of those can be fixed? Focus specifically on {company name} as a company, its owners, its services, customer feedback, former employee reviews, and litigation history. Think harder on this.I would also recommend using a similar prompt to research your company's executives to get a complete picture. For example:
My name is {full name} and I am {job title} at {company}. Analyze how my public profiles (LinkedIn, Github, social networks, portfolio, posts, etc.) make me appear to an outside observer. What story do they tell, intentionally or not?This prompt is really helpful when you need to decide whether or not to respond to a prospective client's request for proposal (RFP). These responses are time consuming (and costly) to do right. And when a prospect is required to use the RFP process but already has a vendor chosen, it's an RFP you want to avoid.
What are the signs a {company name} RFP is quietly written for a pre-selected service partner? Include sources like reviews, posts, and known history of this behavior in your evaluation. Think harder on this but keep the answer brief.People looking for work run into a few roadblocks. One is a ghost job posted only to make the company appear like it's growing or otherwise thriving. Another is a posting for a job that is really for an internal candidate. Compliance may require the posting, but it's not worth your time.
What are the signs a company’s job posting is quietly written for an internal candidate?Another interesting angle a job-seeker can explore are signs that a company is moving into a new vertical or working on a new product or service. In those cases it's helpful to tailor your resume to fit their future plans.
Analyze open job listings, GitHub commits, blog posts, conference talks, recent patents, and press hints to infer what {company name} is secretly building. How should that change my resume below?

{resume text}You'll see all kinds of wild scientific/medical/technical claims on the Internet, usually with very little nuance or citation. A great way to begin verifying a claim is by using a simple prompt like the one below.
Stress-test the claim ‘{Claim}’. Pull meta-analyses, preprints, replications, and authoritative critiques. Separate mechanism-level evidence from population outcomes. Where do credible experts disagree and why?Even if you're a seasoned professional, it's easy to get lost in jargon as new terms are coined for emerging technologies, services, medical conditions, laws, policies, and more. Below is a simple prompt to help you keep up on the latest terms and acronyms in a particular industry.
Which terms of art or acronyms have emerged in the last 12 months around {technology/practice}? Build a glossary with first-sighting dates and primary sources.There's usually more to the story so if you have questions or comments about this post let us know!
Do you need a new software development partner for an upcoming project? We would love to work with you! From websites and mobile apps to cloud services and custom software, we can help!

Lithium-ion batteries are the predominant form of rechargeable battery and are commonly found in portable electronics as well as electrified transportation (Clean Energy Institute). In fact, the average person in the U.S. owns about nine lithium battery-powered devices. And 98% of those people use those devices daily (Recycling Today).
Why lithium? Most batteries today use lithium due to its high energy density, which averages 150-250 Wh/kg (watt-hours per kilogram), and its low self-discharge rate of around 2% per month. So essentially it stores a lot of power for its weight, and holds that charge for a long time.
Lithium Ion (Li-ion): common in laptops, smartphones, tablets, power tools, and EVs. These batteries typically last 500-1,000 charge cycles or around 3-5 years under normal use.
Lithium-Polymer (Li-Po): common in drones, RC vehicles, slim phones, and wearables because of their flexibility in shapes and sizes. These batteries typically last 500-1,000 charge cycles or around 3-5 years under normal use, but are more sensitive to overcharging, deep discharging, and swelling.
Lithium Iron Phosphate (LiFePO₄): common in solar storage, e-bikes, and some EVs. These batteries typically last 1,000-3,000 cycles (8-10 years). They are much safer and more stable than standard Li-ion batteries.
There are two main reasons to recycle or responsibly dispose lithium-based batteries, though they're not mutually exclusive. The first reason is battery aging. The signs that your battery is approaching the end of its normal lifespan include:
The battery discharges much faster than it used to.
It takes much longer to charge than normal, or won't fully charge.
The device shuts down unexpectedly even when the battery indicator shows a remaining charge.
The device overheats during normal use or charging (much hotter than it would get when new).
The second reason is safety concerns. The battery changes below are important safety concerns that you should not ignore. When any of these are the case, take action!
Swelling or bulging of the device or battery pack itself.
The battery is physically damaged (punctured, dented, crushed).
The device or charger warns you of battery issues.
The battery has been exposed to water or extreme heat.
The battery is leaking fluid or has unusual smells.
There are two great reasons to dispose or recycle batteries responsibly: safety and the environment. As you'll see below, lithium can be volatile and cause fires and explosions. It's also a toxic chemical that is bad for the environment when it leeches into drinking water, harms wildlife, and the like.
The following safety guidelines may be obvious, but it's critically important to mention them, regardless. Lithium is a high energy material that can be highly volatile under the right circumstances. So with that in mind...
DO NOT throw the device or battery in household trash; this can very likely cause a household or landfill fire.
DO NOT put the device or battery in curbside recycling; this can cause a fire or explosion in the recycling truck, and these recyclers don't handle battery recycling anyway.
DO NOT burn, crush, or puncture devices or batteries; this releases toxic gases and creates a real fire risk.
DO NOT store long-term if damaged; recycle as soon as possible. The longer you wait, the more likely the battery will leak or combust.
If you have a device or battery that needs to be recycled or responsibly disposed, follow the steps below to get it right and keep everyone safe.
Discharge if possible; drain it the device or battery down to around 20-30%. Do not try to fully discharge a damaged or swollen battery — just handle it carefully.
Protect the terminals; cover exposed battery terminals with non-conductive tape (e.g., electrical or packaging/box tape). This prevents accidental short circuits, which can cause sparks or fire. Some disposal services require that the device/battery be put into a plastic bag.
Handle swelling/damage carefully; if swollen, leaking, or punctured, place the device or battery in a fireproof container (metal box, sand, or cat litter in a plastic bag), and avoid pressing on it or trying to puncture it.
Federal law and low lithium reclamation costs have made it really easy to dispose or recycle a device or battery. Options include local drop-off and mail-in services. And they typically extend to other battery types, including car batteries!
Many electronics retailers (Best Buy, Staples, Home Depot, Lowe's, Batteries Plus, etc. in the U.S.) have battery recycling bins.

Check your local waste authority for hazardous waste collection days or special drop-off sites. The EPA also provides tools for finding disposal locations (https://www.epa.gov/hw/lithium-ion-battery-recycling).
Some battery recycling services, like Call2Recycle in North America, provide prepaid shipping kits (https://www.call2recycle.org/). They will recycle the lithium safely, and properly dispose of the enclosure and other materials.

Device makers like Apple, Samsung, and Dell, often accept batteries and old devices for free recycling. Some even offer store credit towards upgrading the device! Check their websites for details.
There's usually more to the story so if you have questions or comments about this post let us know!
Do you need a new software development partner for an upcoming project? We would love to work with you! From websites and mobile apps to cloud services and custom software, we can help!


In today's fast-paced digital world, managing cloud costs has become a critical challenge for businesses of all sizes. With the sheer volume of services AWS provides, it can be difficult to keep track of spending and identify potential areas for optimization. That's where the recently launched AWS Cost Optimization Hub comes into play. It is a powerful tool designed to simplify cost management, drive savings, and give organizations the insights they need to maximize the efficiency of their cloud infrastructure.
“By using the AWS Cost Optimization Hub, organizations have the potential to save up to 30% or more on their cloud bill, real-world users have reported”
The AWS Cost Optimization Hub is a centralized platform within the AWS Management Console, under Billing and Cost Management, that provides customers with a simple, yet potent set of features to help identify and implement cost-saving measures across their AWS environments. It essentially aggregates all AWS cost optimization services into a single, user-friendly dashboard, and allows you to:
Identify underutilized resources: pinpoint instances or services that are being utilized and may no longer be needed.
Analyze spend patterns: gain visibility into your spending across accounts, regions, and services to spot trends and anomalies.
Implement recommendations: access automated, actionable recommendations that align with best practices for reducing unnecessary costs.
Explore pricing options: easily explore alternative pricing options like reserved instances or savings plans, which can provide significant discounts when you commit to long-term usage.
One of the best features of the AWS Cost Optimization Hub is how simple it is to get started. AWS has made it incredibly easy to enable the hub, even for users who are new to cost management.
If you're already an AWS customer, the Cost Optimization Hub is already available to you. All you need to do is log in to your AWS Management Console, navigate to the Cost Management section, and you'll see the Cost Optimization Hub option. No complex setup is required! So, with just a few clicks, you'll have access to your personalized cost optimization dashboard.
Is it really worth it? Yes! You can get significant savings with minimal effort using this AWS tool. But don't just take my word for it.
Below is an example based on one of our smaller client AWS environments.

They recently engaged us to begin the cost optimization process. And so far, just by using this tool, we were able to find almost 20% in savings. Although this does not represent all of the money saving/efficiency changes that we believe can be made, it provided a list of the changes we can make that are easily shared with the customer. We even get an indication of the effort, risk, and reversibilty of each of the changes.

The AWS Cost Optimization Hub is a game-changer for anyone looking to take control of their AWS spending. Not only does it simplify the complex task of cost optimization, but it also provides actionable insights and recommendations that can lead to significant savings. Plus, it’s incredibly easy to enable, even for beginners — making it accessible to a wide range of users across various industries.
So, if you're looking to reduce your AWS cloud costs while optimizing your resource usage, start with the AWS Cost Optimization Hub and begin unlocking the potential savings that await!
There's usually more to the story so if you have questions or comments about this post let us know!
Do you need a new software development partner for an upcoming project? We would love to work with you! From websites and mobile apps to cloud services and custom software, we can help!

Starting Friday, August 1, you’ll no longer be able to save or manage passwords, use two-factor authentication, or rely on auto-fill features with Microsoft Authenticator as it drops support for its password manager role.
Earlier this summer, Microsoft revealed that they are moving away from using passwords for account authentication and will be using passkeys.
This change is aimed at improving security, since passwords are a security nightmare. A recent survey found that 49% of adults in the US practice poor password habits like reusing passwords or picking easy-to-guess passwords. This leaves users vulnerable to cyberattack, data breaches, ransomware, and more.
But even when using a strong password phishing attacks and social engineering can be used to get you to give up your password to the wrong person. For example, you can be mislead into visiting a website that looks exactly like your bank, and when you try to sign in the bad guys will get your credentials.
Yikes.
Passkeys are not vulnerable to these attacks. In fact, you won't know your passkeys so you can't give them out. And the nefarious server can't perform the negotiation necessary to use your passkey.
The transition to passkeys is happening soon, so it’s a good time to understand how Microsoft will handle this shift and to consider a replacement password manager if necessary.
So, what are passkeys? Passkeys are credentials developed by the Fast Identity Online (FIDO) Alliance, whose underlying technology has been around for decades. They let you use biometrics (like your fingerprint or face) or a device PIN to verify who you are. Think of logging in with Face ID or a fingerprint instead of typing a password. This approach offers stronger protection against guessing and phishing.
Why? Weak passwords are vulnerable to being guessed, but passkeys require both a public and a private (device) key to authenticate. This prevents phishing/social engineering, brute-force, and credential-stuffing attacks.
What if I use a strong password? That's helpful, but password hashes are typically stored on a server so that the password can be verified during login. If the database is breached this provides a way to reverse engineer your password. Unlike passwords, passkeys don't require hashes to be stored on servers. In fact nothing about your passkey is stored on a server. They exist only on your device. And using modern encryption technology, they eliminate the need to remember complex passwords or use a separate password manager.
According to the May 1 Microsoft blog post, Microsoft will soon guide users to set up passkeys as the main way to sign in to their accounts. If you already have a password and a one-time code set up, you’ll only be prompted to use your code to sign in. After logging in, you’ll then be asked to create a passkey. Going forward, signing in will require that passkey.
To add a passkey, open the Microsoft Authenticator app on your mobile device. Choose your account, then select “Set up a passkey.” You’ll first verify your identity, then you’ll be able to create a passkey.
Since Microsoft Authenticator is dropping password support, you’ll want to select a different password manager for websites that use passwords.
Apps like Bitwarden and 1Password are ideal as they provide free and/or affordable plans, and also work with passkeys. A new feature of the passkeys specification provides passkey portability; the ability to transfer passkeys between devices and apps. If you use a manager like Bitwarden or 1Password you essentially already have access to your passkeys across all your devices without that new passkeys feature. But in the future you should be able to export your passkeys from Chrome on Windows, for example, and import them into Safari on a Mac.
There's usually more to the story so if you have questions or comments about this post let us know!
Do you need a new software development partner for an upcoming project? We would love to work with you! From websites and mobile apps to cloud services and custom software, we can help!

Modern computers, laptops, and mobile devices use solid state drive (SSD) storage, which is power efficient and fast! Since SSDs have no moving parts they're also more durable than hard disk technology in mobile scenarios.
But SSD storage does have limitations. Two primary concerns are:
Essentially, data is written to SSD storage as static charges in individual cells. These cells would normally hold a charge for a very long time, but the act of charging the cell is destructive. It takes a high voltage to weaken the cell barrier before the cell can be charged. And every time a cell is written the barrier is permanently weakened. Eventually the cell will not be able to reliably store a charge.
SSDs manage this problem in a few ways. One tactic is wear leveling, which means that data isn't generally written to the same cell. The drive writes to new cells as often as possible. This levels out the wear across all cells. Another strategy they use is to keep a bank of extra (hidden) cells available. When the SSD sees that a cell is sufficiently "bad", one of the "backup" cells will take its place. All of this happens in the background.
As cells lose their ability to hold a charge, the first symptom is a slowdown in reads. The SSD will try to read a cell, which sometimes returns a bad value (according to an ECC check), so it has to read it again, likely at a different voltage. Eventually the cell returns the correct value. But these repeated read attempts noticeably slow overall drive performance.
For computers and SSD drives that stay powered off for extended periods, you'll see advice that recommends turning on the device every so often. But all that really does is give the SSD a chance to mark bad cells, provided the device tells it to read or write to that bad cell in the first place. Some high end SSDs will perform periodic cell rewrites to refresh the data on their own, but consumer SSDs don't typically do this. To be clear: powering up an SSD does not recharge the cells or truly address these issues.
New SSDs can reliably store data for several years without power. But after actively using an SSD for months or years, it makes sense to begin periodically refreshing the cells. This not only ensures more reliable storage over time, it can also noticeably speed up SSD performance.
I ran some tests on my local workstation to verify these claims. I used a 2 year old MacBook Pro with an SSD boot drive that has remained more than half empty, ensuring lots of new cells were available for writes. It has had several OS upgrades and a couple format/rebuilds.
That Mac booted to login in 16.6 seconds. After refreshing the SSD with the same data, it booted to login in 14 seconds, which is over 15% faster. This indicates that overall performance should also improve, at least with regard to storage transfers anyway. So even on a relatively current machine there was a noticeable speed increase. As a software developer, the biggest benefit for me was the improved reliability.
So, if you want to refresh an SSD, following are some quick guides to help you through the process.
The easiest way to refresh your SSD on Windows is to use SpinRite (https://www.grc.com/sr/spinrite.htm). This is a time-tested, rock solid utility for hard disk maintenance and recovery, which can also handle SSD storage. Run this tool on level 3 to refresh all the cells and map out any bad cells. It will also work wonders on your hard disks.
Note: you need a computer with an Intel chip. SpinRite will not run on Arm.
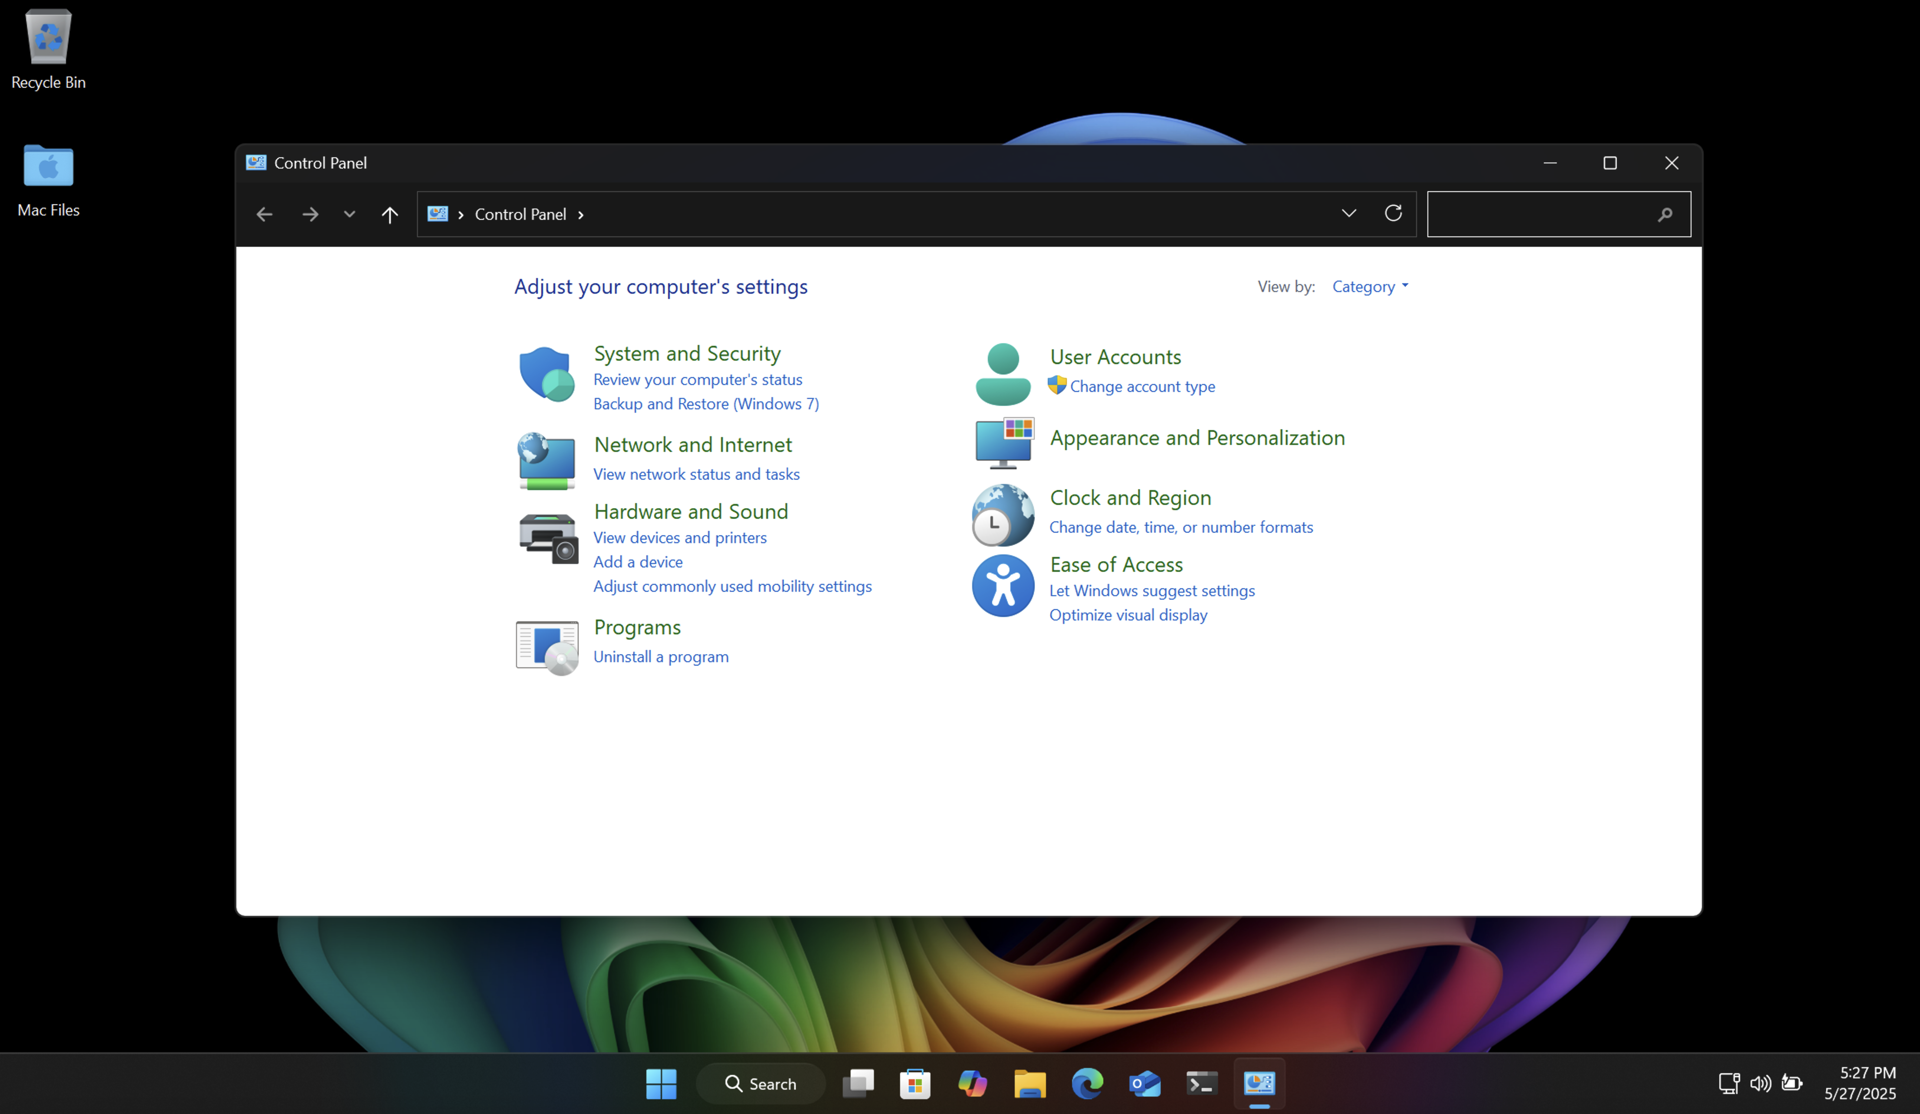
Another way to do this without additional software is to make a system image of your drive using the poorly named "Backup and Restore (Windows 7)" control panel. This clones your entire drive (even the recovery partition) to a USB flash drive or other external media. You can then boot into recovery mode and restore the entire drive from that system image. You'll end up with the same PC with all your files intact. And you will have a backup of your drive for future use.

Both of these methods will return your SSD to like-new performance, and ensure longer data retention.
Unlike with Windows, there are no great utilities like SpinRite for modern Apple Silicon Macs. But fear not! There is a way to refresh SSD cells using the built-in Time Machine feature. And it's pretty easy to use. You will be backing up your Mac, then erasing it, reinstalling macOS, and then restoring the backup.
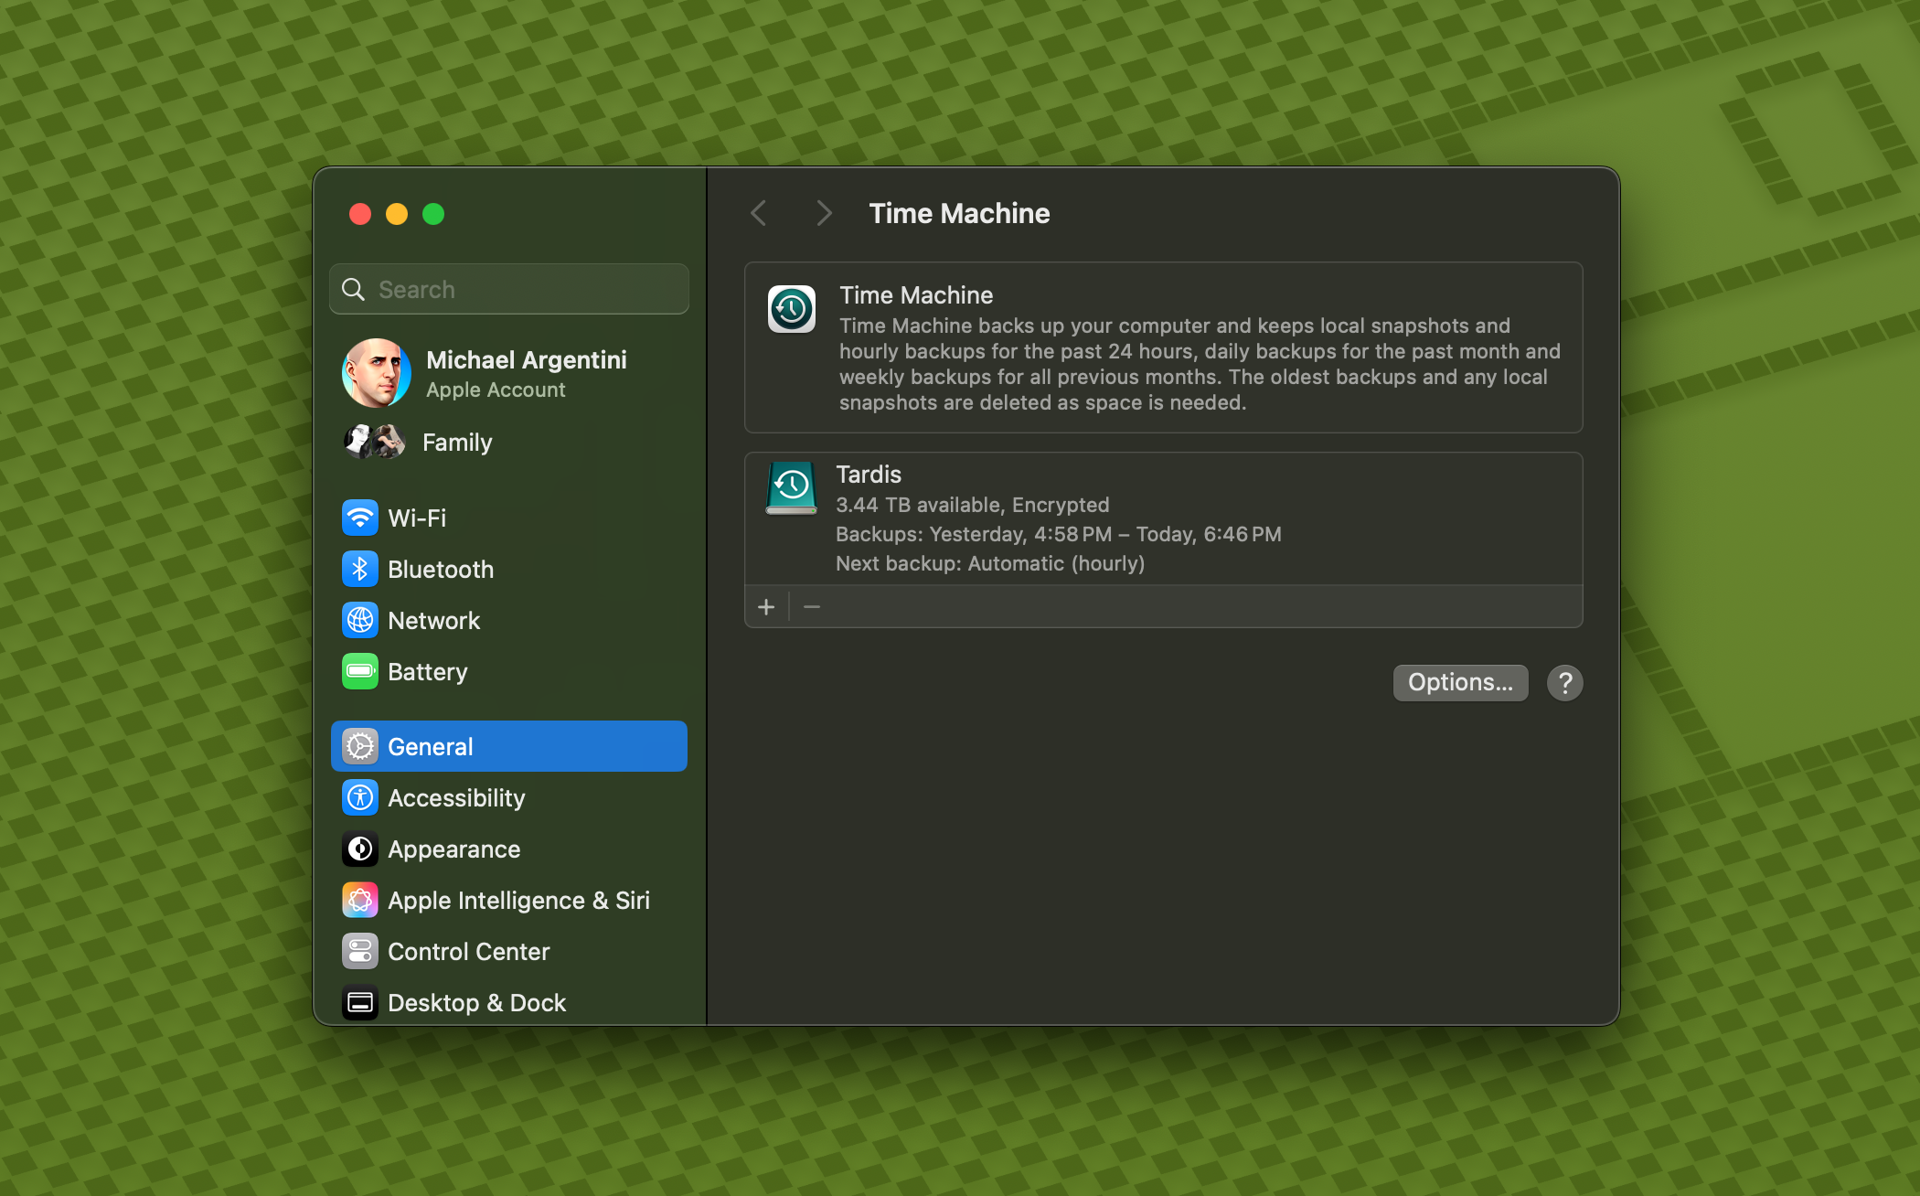
Connect an external storage device to your Mac and configure it in Time Machine as your backup device. Then run a backup.
Note: some applications, like Docker, do not allow Time Machine to back up their data by default. In the case of Docker there is an option to enable this.
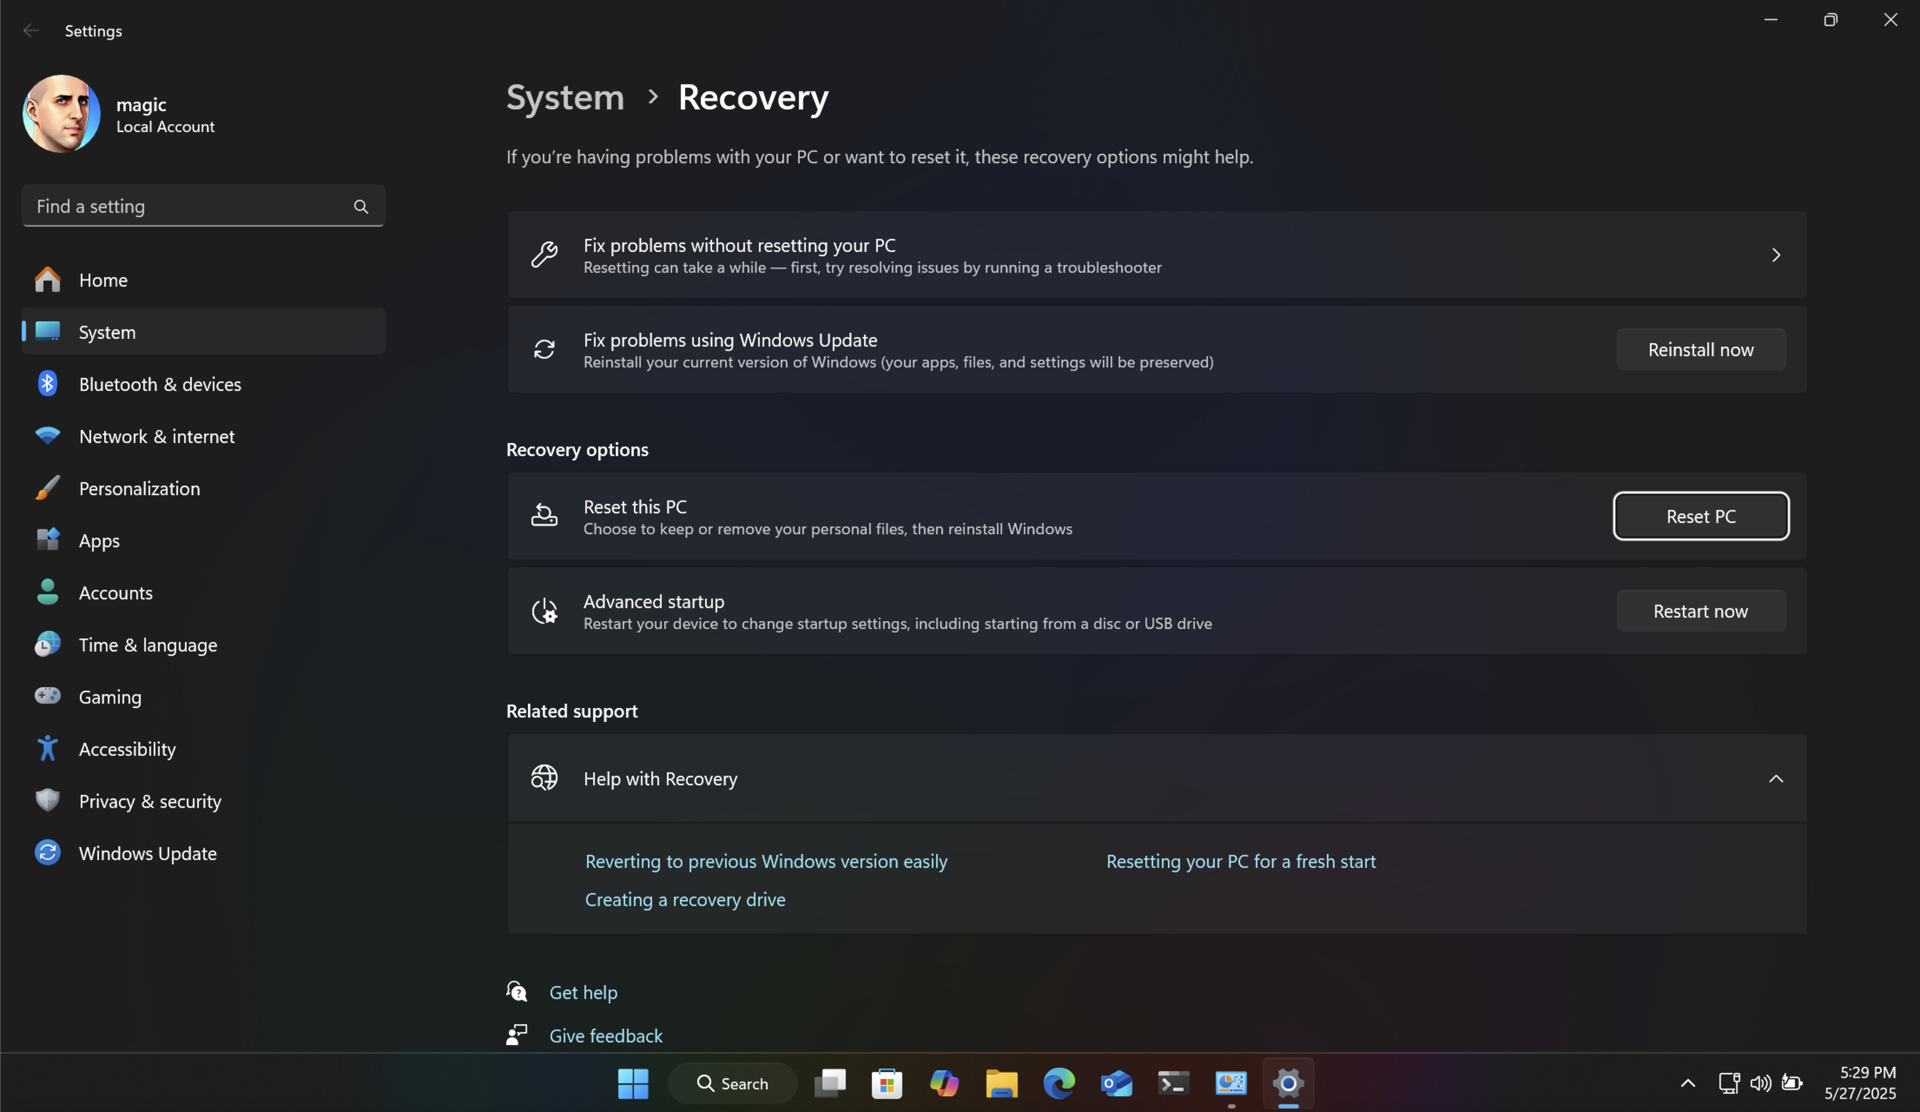
Once you have a complete backup, restart your Mac into recovery mode. On modern Apple Silicon Macs you just shut down the computer. Then turn it back on by pressing the power button until the Mac tells you it is loading startup options.
Use Disk Utility to erase the SSD, and then choose to reinstall macOS.
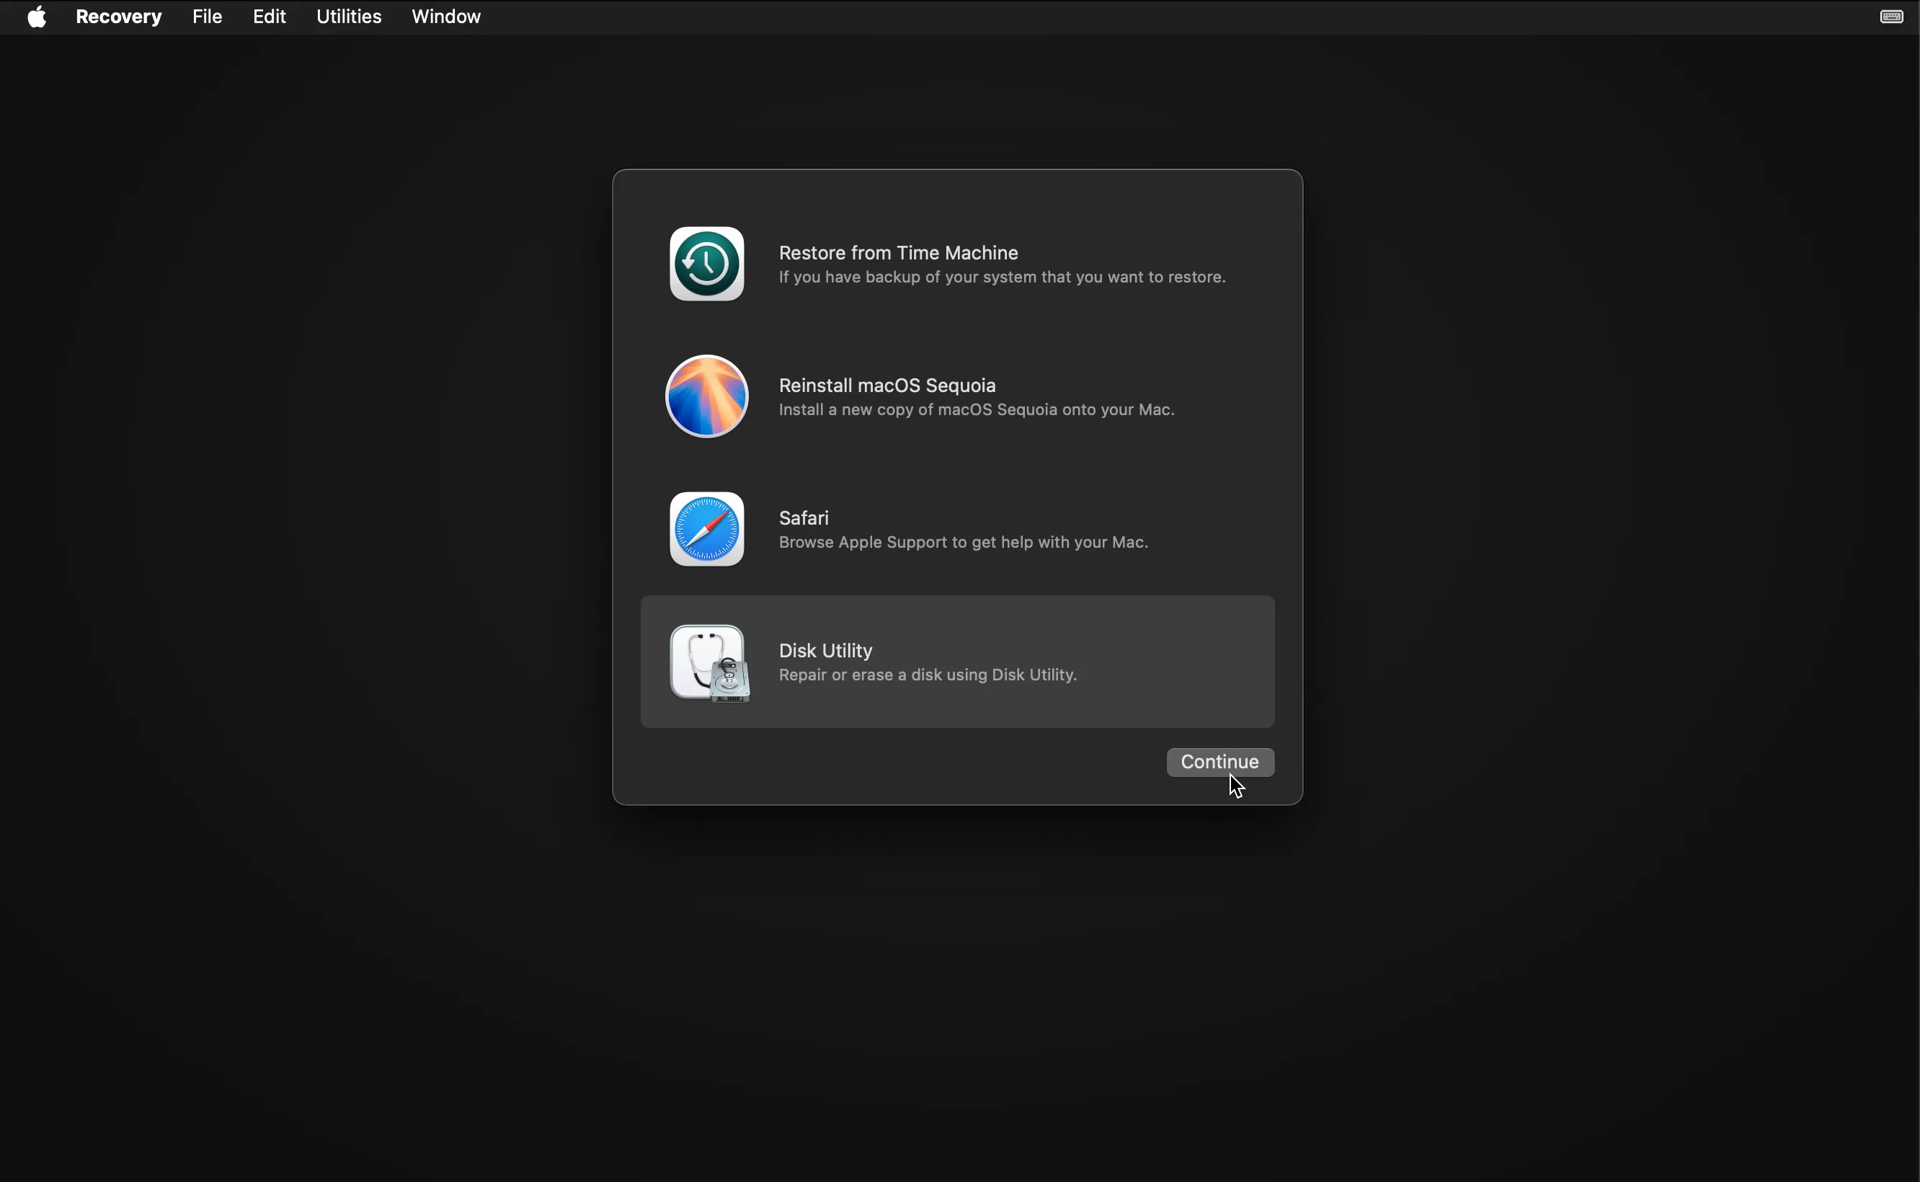
After the OS is installed it will restart and run Migration Assistant.

Choose to transfer files from Time Machine, and follow the instructions. It will show you all Time Machine backups for connected drives. Choose the latest backup entry for your backup drive, and let Migration Assistant do its thing. You will be left with a refreshed SSD with all your files intact.
The research in this area is nascent, so the optimal frequency for refreshing your SSD cells really depends on how well it is performing, how many writes have been made, and how full it is on average. On my server data drive I rarely write new files. But the data is very important. So I'm planning on refreshing the cells yearly just to be safe.
So how often should you run this process? If your SSD is new or averages under 50% usage, and is under 10 years old, I would do this yearly through that period. As your SSD ages (or if you have a mostly full SSD) it may be better to run it more frequently.
There's usually more to the story so if you have questions or comments about this post let us know!
Do you need a new software development partner for an upcoming project? We would love to work with you! From websites and mobile apps to cloud services and custom software, we can help!

Qualys has a free tool named SSL Labs that anyone can use to check the security of their website TLS certificates and certificate hosting configuration. This is an frequently overlooked area of securing a website and we highly recommend using it on your own website. In fact, we use it on all our website projects to secure our client websites, and dog food it for fynydd.com (we score an A+ by the way).
The SSL Labs tool will evaluate a ton of certificate hosting exploits like BEAST, POODLE (SSLv3), POODLE (TLS), Zombie POODLE, GOLDENDOODLE, Sleeping POODLE, and more.
It will also scan your server's TLS/SSL protocol support to ensure that you're using the latest version (TLS 1.2 at the time of this writing) and that your server has disabled legacy protocols to prevent protocol fallback attacks. In fact, if you're hosting with Microsoft Internet Information Service (IIS) we highly recommend installing the "Setup Microsoft Windows or IIS for SSL Perfect Forward Secrecy and TLS 1.2" PowerShell script to lock down your server TLS/SSL protocol support.
There's usually more to the story so if you have questions or comments about this post let us know!
Do you need a new software development partner for an upcoming project? We would love to work with you! From websites and mobile apps to cloud services and custom software, we can help!
Web developers rejoice! There's an easy way to animate the height of an HTML element even if the height is dynamic, determined by its content, with only CSS. This is typically used for navigation menus and the like, and now it's much easier to code and maintain.
The strategy is to actually animate the grid-template-rows not the height. For example, take the following HTML markup:
The CSS for this markup would be:
Initially the outer div will be hidden since it has no overflow and the grid template rows are zero. When you add active to the outer div element's class list, the browser will animate the transition from zero row height to 1fr, which essentially means the height it needs for its content to render.
There's usually more to the story so if you have questions or comments about this post let us know!
Do you need a new software development partner for an upcoming project? We would love to work with you! From websites and mobile apps to cloud services and custom software, we can help!